Architectural Design Approach
In-Scope
Out of Scope
Required Soft/Hardware

Architectural Design Approach
In-Scope
Out of Scope
Required Soft/Hardware
Any user can use this file to understand sharePoint site Structure and Information Architecture.
Phase Activity No of Resources Effort ( hrs ) Deliverable Requirements Study Requirements Gathering 0.00 Requirements Document Design User Interface Design 0.00 UI Functional Prototype Coding and Unit Testing Business Interfacing Objects / Business Processes /
Database Objects 0.00 Unit Test Plan Testing System Testing 0.00 System Test Plan
System Test Execution Results User Acceptance Testing Implementation and Support Cut Over to Production 0.00 Post-Production Support + Knowledge Transfer User Training Turnover Documentation Documentation + Code Other Miscellanous Tasks, if applicable Environment Setup 0.00 Integration with Legacy systems 0.00 Data Migration 0.00 Documentation 0.00 User Manual, Help Files, etc. Review / Rework 0.00 QA / DBA / Domain 0.00
<style>
table.ms-listviewtable{width:100%;}

.ms-listviewtable > tbody > tr { background: white;}

.ms-listviewtable > tbody > tr td{

 border-left: 1px solid #AFAFAF !important;

 border-bottom: 1px solid #AFAFAF !important;

 background: #fff;
text-align:center;
}

.ms-selectedtitle > tbody > tr td{border:0px !important;}

.ms-vb-lastCell{ border-right: 1px solid #AFAFAF !important; }

.ms-listviewtable tr.ms-viewheadertr {

background: transparent;

}


                                tr.ms-viewheadertr > th.ms-vh-icon,

                                tr.ms-viewheadertr > th.ms-vh,

                                tr.ms-viewheadertr > th.ms-vh2 ,tr.ms-viewheadertr > th

                                {

                                                background: #0387D1 !important;
text-align:center;font-weight:bold;


                                                color: #fff;

                                                font-size: 14px;

}


.ms-vh2,.ms-vh2:hover,.ms-vh2-nofilter{border-left: 1px solid #ccc;}

                                tr.ms-viewheadertr > th.ms-vh:hover,

                                tr.ms-viewheadertr > th.ms-vh2:hover {

                                            background-color: #0387D1;


                                }


                                .ms-viewheadertr a,

                                .ms-viewheadertr div {

                                                color: white;

                                }


                                .ms-viewheadertr a:hover,

                                .ms-viewheadertr div:hover {

                                                color: white;

                                }


                                .ms-unselectedtitle tbody tr td,.ms-unselectedtitle tbody tr td:hover

                                ,.ms-selectedtitle tbody tr td,.ms-selectedtitle tbody tr td:hover{background: #0387D1 !important;border:none !important;                        }

                                .ms-unselectedtitle tbody tr td a{color: #fff; font-size: 14px;}


.ms-viewheadertr .ms-vh2 .ms-selectedtitle,.ms-viewheadertr .ms-vh2 .ms-selectedtitle:hover,.ms-unselectedtitle:hover{background:#2a43b1; }

.ms-listviewtable .ms-core-menu-box *{color: #000;}

.ms-vh2 .ms-selectedtitle .ms-vb, .ms-vh2 .ms-unselectedtitle .ms-vb,

.ms-vh2 .ms-selectedtitle .ms-vb:hover, .ms-vh2 .ms-unselectedtitle .ms-vb:hover,

.ms-vh2 .ms-selectedtitle .ms-vb a, .ms-vh2 .ms-unselectedtitle .ms-vb a

{padding: 0px !important;text-decoration:none;}

.hrscroll{ max-width: 100%;

  min-width: 100%;

  width: 100%;

  overflow-x: auto;

}


table.ms-listviewtable tr th div.s4-ctx {top: -20px !important;

  right: -18px !important;

  height: 24px !important;

  line-height: 24px !important;

  margin: 0px;}


table.ms-listviewtable tr th div.s4-ctx  a.ms-headerSortArrowLink img{

display:none !important;

}


table.ms-listviewtable tr th div.s4-ctx  a.ms-headerSortArrowLink,

table.ms-listviewtable tr th div.s4-ctx  a:link.ms-headerSortArrowLink,

table.ms-listviewtable tr th div.s4-ctx  a:visited.ms-headerSortArrowLink,

table.ms-listviewtable tr th div.s4-ctx  a:hover.ms-headerSortArrowLink{

background: url('/_layouts/15/images/sixeimages/lstarw.png') center center;

width:16px;

height:25px;

background-repeat:no-repeat;

}


.ms-unselectedtitle .ms-menuimagecell{  visibility: visible !important;}

th .ms-selectedtitle .ms-vb, th .ms-selectedtitle .ms-vh2-nofilter-icon, th .ms-selectedtitle .ms-vb a, th .ms-selectedtitle .ms-vh2-nofilter-icon a{color:#fff;}

.Dashboardpaging td {color: #FFF;border-top:1px solid #ccc;padding:5px;}

.Dashboardpaging td:last-child{border-right:1px solid #ccc;}


.Dashboardpaging td table tr td{background:#0387D1 !important;}

.Dashboardpaging td span{font-weight:bold;}

.ms-listviewtable > tbody > tr td:last-child{border-right:1px solid #ccc;}


.ms-listviewtable .ms-vh-icon:last-child{display:none;}

th.ms-vh2{min-width:95px;}

.s4-ctx,.s4-ctx:hover{

padding: 0px 22px !important;

}

#sideNavBox{
 display: none;
 }
#contentBox{
 margin-left: 20px ! important;
}
#contentRow {
    padding-top: 0px;
}
#s4-titlerow {
    height: 0px;
}
#titleAreaBox{
display: none;
}
</style>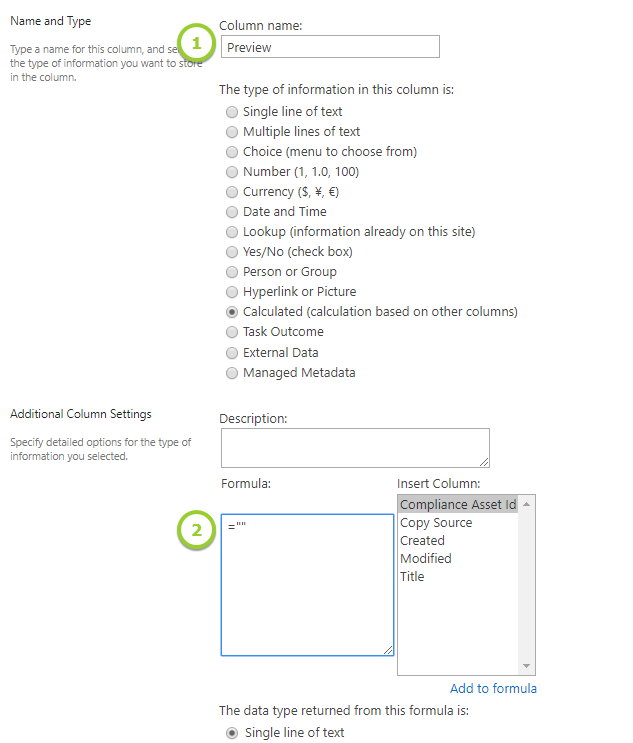
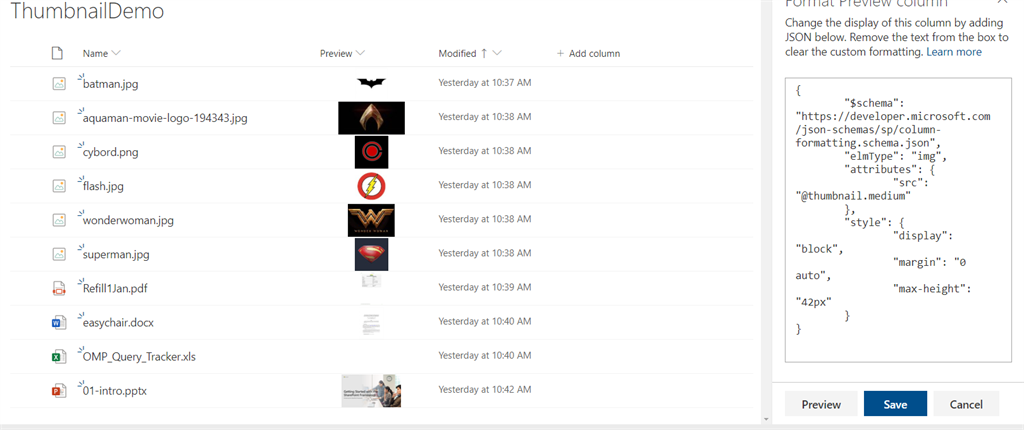
| @thumbnail.small | auto small sized thumbnail |
| @thumbnail.medium | auto medium sized thumbnail |
| @thumbnail.large | auto large sized thumbnail |
| @thumbnail.200 | custom – 200 width and 200 height |
| @thumbnail.200×100 | custom – 200 width and 100 height |
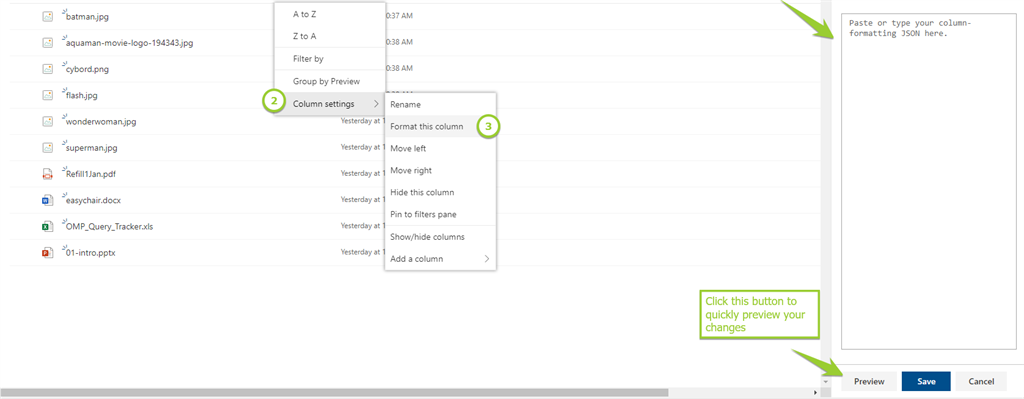
I had been exploring column formatting and it can do awesome things. Before this feature if we had to format our list view we had to use link or use custom code to format data based on our requirement.
Calling Azure AD Secured Azure Function Externally From JavaScript
My customer recently had a need to securely call an HTTP trigger on an Azure Function remotely from an arbitrary client web application. In this scenario securely meant ensuring that the user has logged into Azure Active Directory (AAD), but any number of authentication providers could be used. The SharePoint Patterns and Practices (PnP) team had posted a video (SharePoint PnP Webcast – Calling external APIs securely from SharePoint Framework) that used the SharePoint Framework but my team needed to do this from vanilla JavaScript. Many thanks to the PnP team and my peer Srinivas Varukala for their inspiration and code samples.
The key components to this solution involve the following:
In the Azure Portal create a new Azure Function. Choose an HTTP Trigger and use the language of choice (I’m using C# script in this example). The Azure Function will validate if a claims principal exists on the incoming request and then output to the logs the name of the user if authenticated.
<Update 2018-05-02>
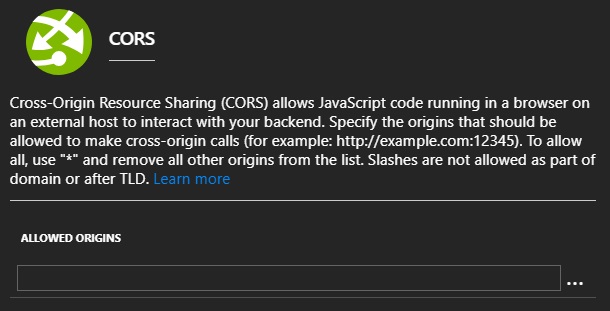
Note: the Azure portal currently does not support the headers required for CORS (cross-origin resource sharing) requests that contain credentials. Feedback (source) has been provided to the Azure App Service team to support this but was declined. As such the manual processing of CORS requests is not supported at this time. You will need to determine if this workaround works for you or not.
</Update 2018-05-02>
|
1
2
3
4
5
6
7
8
9
10
11
12
13
14
15
16
17
18
19
20
21
22
23
24
25
26
27
28
29
|
using System.Net;using System.Security.Claims;using System.Threading;public static HttpResponseMessage Run(HttpRequestMessage req, TraceWriter log){ log.Info("C# HTTP trigger function processed a request.");// check for authenticated user on incoming request if (!ClaimsPrincipal.Current.Identity.IsAuthenticated) { log.Info("Claims: Not authenticated"); } else { log.Info("Claims: Authenticated as " + ClaimsPrincipal.Current.Identity.Name); } var resp = req.CreateResponse(HttpStatusCode.OK, "Hello there " + ClaimsPrincipal.Current.Identity.Name); // manually process CORS request if (req.Headers.Contains("Origin")) { var origin = req.Headers.GetValues("origin").FirstOrDefault(); resp.Headers.Add("Access-Control-Allow-Credentials", "true"); resp.Headers.Add("Access-Control-Allow-Origin", origin); resp.Headers.Add("Access-Control-Allow-Methods", "GET, POST, OPTIONS"); resp.Headers.Add("Access-Control-Allow-Headers", "Content-Type, Set-Cookie"); } return resp;} |
In order to enforce Azure AD authentication on the Azure Function an Azure AD app registration needs to be created. Log into the Azure AD admin portal. Under Azure Active Directory –> App Registrations create a new app registration.

Take note of the Application ID (also known as client ID) for the application created. This will be used later in the Azure App Service authentication / authorization configuration.

The default permissions for the Azure AD app registration (delegated: sign in and read user profile) will be sufficient.


Return to the Azure Function and navigate to the Platform features –> Authentication / Authorization screen. Turn App Service Authentication to On, set “Action to take…” to “Log in with Azure Active Directory”, then click the Azure Active Directory authentication provider to configure it as follows.

Fill in the Application ID / Client ID from the previously created Azure AD app registration. Specify the IssuerUrl of the Azure AD domain (typically https://login.microsoftonline.com/TENANT_NAME_GOES_HERE.onmicrosoft.com).

As noted previously, the Azure portal currently (as of writing May 1, 2018) does not support Azure App Service processing CORS requests that contain credentials. As such removing all domains from the CORS configuration in Azure Portal is unsupported. Please validate if this workaround works for you or not.
In this example I started with a .Net Framework MVC project from Visual Studio 2017 v15.6.7 but the code could be hosted on any page with HTML, JavaScript, and a logged in user to Azure AD. Note that the MVC project allows enforcing Azure AD authentication which is what I was most interested in.


HTML snippet to include inside of an IFRAME element with source pointing to root of Azure Function.

<Update 2019-04-11> After the IFRAME has loaded and authenticated you should see a cookie tied to the domain hosting the Azure Function. See following for successful setting of the auth cookie.

If this cookie is not set (ex. cookie size is too large, request / response headers deny the cookie, cookies not allowed by policy, etc.) the outgoing AJAX request will not be able to satisfy the authentication requirement which will result in an error. See following for sample issues that could be encountered when setting the auth cookie.

</Update 2019-04-11>
JavaScript snippet to call HTTP trigger of Azure Function.
Note that in a production scenario you would want to ensure that the IFRAME has loaded fully (and thus authentication cookie set) prior to the Azure Function being called.
|
1
2
3
4
5
6
7
8
9
10
11
12
13
14
15
16
17
18
19
20
21
|
$(document).ready(function () { $("#btnExternalCall").click(function (e) { var serviceURL = "https://NAME_OF_AZURE_FUNCTION_GOES_HERE.azurewebsites.net/api/HttpTriggerCSharp1"; $.ajax({ url: serviceURL, type: "GET", xhrFields: { withCredentials: true }, crossDomain: true, success: function (data) { alert("Success: " + data); }, error: function (ex) { alert("Failure getting user token"); } }); });}); |
When all has been configured you can test scenario. If you enter F12 developer tools from your browser of choice you should see the authentication cookie for both the client web application as well as the Azure Function domains.

After issuing the call to the HTTP Trigger on the Azure Function you should see that the call was indeed authenticated and the ClaimsPrincipal is returned.


This is a very powerful capability being able to ensure that an HTTP trigger on an Azure Function only allows authenticated users to call the endpoint. Hopefully this post helps others who have a similar need. Please leave and questions or feedback in the comments below.
This tutorial will cover how to create a simple HTML button which will export a particular list & list view to Excel.
Materials Needed:
<input type=”button” style=”width:180px; height: 75px; 30px;background:gray; color:white;font-size:larger; font-weight:bold;”onclick=”window.location.href=’SITEURL/_vti_bin/owssvr.dll?CS=109&Using=_layouts/query.iqy&List={YOUR LIST ID}&View={YOUR VIEW ID}&CacheControl=1′;” value =”YOUR BUTTON TEXT”/>
The code above is essentially everything that you will need for a simple Excel Export button. In order to get the code to work, you will need to update the SITEURL, YOUR LIST ID, YOUR VIEW ID, & YOUR BUTTON TEXT.
The hardest part of this exercise is to determine what your list & view ID are, but even that is simple!
To Obtain Your List & View ID:
To Implement The Button:
https://code.responsivevoice.org/responsivevoice.js
<input onclick=’responsiveVoice.speak(“Hello World”);’ type=’button’ value=’🔊 Play’ />
Here we are doing recursive call to the GetListItems() function. This will fetch data in the bunch of 1000 items and concat it to response variable.
 var url = _spPageContextInfo.webAbsoluteUrl + "/_api/web/lists/getbytitle('DocumentList')/items?$select=customerID&$top=1000";
    var response = response || [];  // this variable is used for storing list items
    function GetListItems(){
        return $.ajax({
            url: url,
            method: "GET",
            headers: {
                "Accept": "application/json; odata=verbose"
            },
            success: function(data){
                response = response.concat(data.d.results);
                if (data.d.__next) {
                    url = data.d.__next;
                    GetListItems();
                }
                $.each(response, function(index, item) {
                    arrayCustomerID[index] = item.customerID;
                });
            },
            error: function(error){
            }
        });
    }